
Building a custom gaming desktop allows you to tailor every aspect of your system to fit your specific gaming needs and preferences. Unlike purchasing a pre-built computer, assembling a custom gaming desktop ensures you get maximum performance for your budget by carefully selecting each component. This process not only enhances your gaming experience but also deepens your understanding of computer hardware and software, making you more adept at troubleshooting and upgrading your system in the future.
The allure of custom gaming desktops lies in their customization and scalability. You can start with a modest setup and gradually upgrade components as your needs evolve or as newer technology becomes available. This adaptability makes custom builds a popular choice among gaming enthusiasts.
In the next section, we’ll dive into the planning phase of your custom gaming desktop, focusing on how to set clear objectives and budget guidelines, followed by an in-depth look at choosing the right components for your build.
Planning Your Build
Creating a successful custom gaming desktop begins with thoughtful planning and budgeting. In this section, we’ll explore how to set clear objectives and choose the right components to meet your gaming requirements.
Setting Goals and Budget
Establishing Goals: Before you start buying parts, think about the games you want to play and the performance expectations you have. Do you aim for high-resolution 4K gaming, or are you more interested in competitive esports titles that favor high frame rates? Your goals will directly influence the type of components you need.
Setting a Budget: Your budget is crucial. It determines how much you can afford to spend on each component. A balanced budget helps you allocate funds wisely, ensuring you invest more in crucial parts like the CPU and GPU, which significantly impact gaming performance.
Choosing the Right Components
Processor (CPU): The CPU is the heart of your gaming desktop. For gaming, look for a processor with high clock speeds and multiple cores. Popular choices among gamers are AMD Ryzen and Intel Core processors due to their excellent performance in gaming and multitasking.
Graphics Card (GPU): The GPU is the most critical component for gaming. It renders the graphics and is pivotal for achieving smooth frame rates and high resolutions. Nvidia and AMD offer a range of options that cater to different budgets and performance levels.
Memory (RAM): For gaming, 16GB of RAM is typically sufficient. It allows for smooth multitasking and gaming without slowdowns. If you plan to stream or use intensive software, consider 32GB.
Storage (SSD/HDD): An SSD will dramatically improve loading times compared to a traditional HDD. For gaming, consider at least a 500GB SSD for your operating system and frequently played games. You can also add a larger HDD for additional storage needs.
By understanding and prioritizing these components based on your gaming preferences and budget, you set a strong foundation for your custom gaming desktop. With your goals and budget set and a clear idea of the components you need, you’re ready to find the best places to purchase these parts.
Where to Buy Components
Finding the right place to buy components for your custom gaming desktop is as crucial as selecting the parts themselves. In this section, we’ll discuss the pros and cons of online versus local purchases, tips for finding the best deals, and how to identify reliable brands and suppliers.
Online vs. Local Stores
Online Stores: Shopping online for PC components often provides a wider selection and better prices compared to local stores. Websites like Amazon, Newegg, and direct sales from manufacturers like Dell, HP, or Asus offer competitive pricing and frequent sales. However, the inability to physically inspect products and potential shipping costs are downsides.
Local Stores: Purchasing from local electronics stores like Best Buy or specialized computer shops allows you to see and compare components directly. Local stores also offer immediate ownership without waiting for shipping. However, their prices can be higher, and the selection might be limited compared to online options.
Tips for Finding the Best Deals
Compare Prices: Use price comparison websites to find the best deals on the components you’ve chosen. Keep an eye on price history to avoid buying at peak prices.
Watch for Sales: Take advantage of sales events like Black Friday, Cyber Monday, and back-to-school promotions, which often feature substantial discounts on electronics.
Use Price Alerts: Set up price alerts for specific components to get notified when prices drop, ensuring you never miss a good deal.
Reliable Brands and Suppliers
Choosing reliable brands not only guarantees product quality but also ensures good customer support and warranty services. For CPUs and GPUs, brands like Intel, AMD, and Nvidia are top choices. For motherboards, Asus, MSI, and Gigabyte are renowned for their durability and performance. Always check customer reviews and ratings before making a purchase to gauge the reliability of the brand and the product.
By shopping smart and choosing reliable suppliers, you can make the most of your budget and ensure that you get high-quality components for your custom gaming desktop.
Assembling Your Custom Gaming Desktop
Putting together your custom gaming desktop is a rewarding experience. This section provides a detailed, step-by-step guide to assembling your PC, highlighting common pitfalls and the tools you’ll need.
Step-by-Step Assembly Guide
1. Prepare Your Workspace: Choose a clean, uncluttered area with plenty of light to work in. A static-free environment is crucial to prevent damaging sensitive electronic components.
2. Install the CPU:
Open the CPU socket on your motherboard.
Align the CPU with the socket, looking for the marking that indicates the correct orientation.
Carefully place the CPU into the socket without forcing it. It should drop in easily.
Lock the CPU in place by closing the socket lever.
3. Install RAM:
Identify the RAM slots on your motherboard.
Align the RAM sticks with the slots, ensuring the notches match.
Firmly press the RAM into the slot until the clips snap closed on both sides.
4. Install the Motherboard in the Case:
Place the motherboard’s I/O shield into the case.
Carefully lower the motherboard into the case, aligning it with the standoffs.
Secure the motherboard with screws.
5. Install the Power Supply (PSU):
Fit the PSU into its slot at the bottom or top of the case.
Secure it with screws to the case.
Connect the power cables to the motherboard and other components as required.
6. Install the Graphics Card:
Locate the PCIe x16 slot on your motherboard.
Remove the corresponding backplate on the case.
Insert the GPU into the slot and secure it with a screw.
Connect any necessary power connectors from the PSU to the GPU.
7. Install Storage Devices (SSD/HDD):
Mount the SSD or HDD in the drive bays.
Connect SATA data cables to the motherboard and power cables from the PSU.
8. Connect Fans and Cooling System:
Install any additional fans or a liquid cooling system.
Connect fan cables to the appropriate headers on the motherboard.
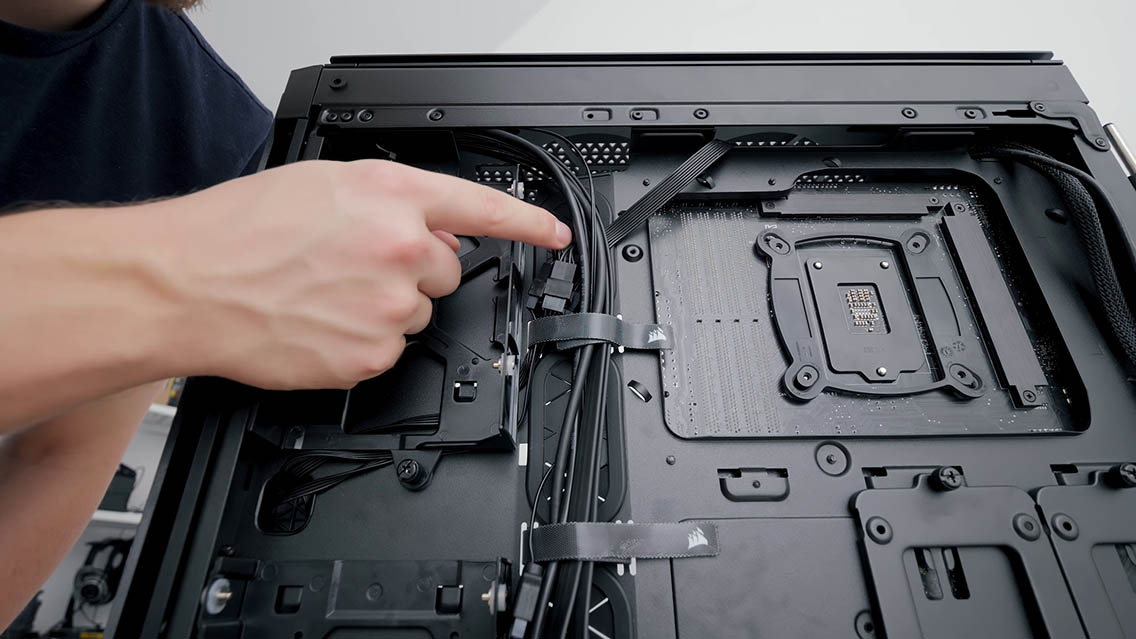
9. Final Wiring:
Route and manage cables neatly to improve airflow and aesthetics in your case.
Use cable ties to secure loose cables.
10. Close the Case and Connect Peripherals:
Attach the side panels of the case.
Connect your monitor, keyboard, mouse, and any other peripherals.
Common Pitfalls and How to Avoid Them
Forcing Components: Never force a component into place. If it doesn’t fit easily, it’s likely not aligned correctly.
Electrostatic Discharge (ESD): Always ground yourself when handling components to prevent ESD. Using an anti-static wrist strap or mat is recommended.
Incorrect Cable Connections: Double-check all connections. Incorrect wiring can prevent the system from booting or cause hardware damage.
Tools Needed for Assembly
- Screwdrivers: A basic set of Phillips head screwdrivers is essential.
- Anti-static Wrist Strap: Reduces the risk of electrostatic discharge.
- Thermal Paste: Necessary if you install a CPU cooler or aftermarket GPU cooler.
- Cable Ties: Helps with cable management for better airflow and cleanliness.
Assembling a custom gaming desktop can be straightforward if you follow these steps carefully. Next, we will look at installing software and optimizing settings to get your new gaming machine up and running.
Installing Software
Once you’ve assembled your custom gaming desktop, the next step is to install the operating system (OS) and essential software. This stage is crucial for making sure your gaming PC operates smoothly and efficiently.
Operating System Installation
Choosing an OS: Most gamers prefer Windows due to its broad compatibility with games and gaming hardware. However, Linux is an option for those who want a free OS, though it may not support all games.
Installation Process:
- Purchase or download a copy of your chosen OS.
- Create a bootable USB drive with the OS installer.
- Insert the USB drive into your PC and boot from it.
- Follow the on-screen instructions to install the OS, which includes formatting your primary drive and setting up user accounts.
Necessary Drivers and Software
Drivers:
- Motherboard/Chipset Drivers: Install the latest drivers from the motherboard manufacturer’s website.
- Graphics Card Drivers: Download and install the latest drivers from Nvidia or AMD, depending on your GPU. This ensures optimal performance and compatibility with games.
- Peripheral Drivers: For gaming mice, keyboards, or specialized controllers, install the necessary drivers and configuration software from the manufacturer’s website.
Essential Software:
- Antivirus Software: Protect your PC from malware, especially if you frequently download games and apps from the internet.
- Game Platforms: Install platforms like Steam, Epic Games Store, or Origin to download and manage your game library.
- System Monitoring Tools: Software like MSI Afterburner for monitoring temperatures and tweaking GPU settings, or CPU-Z for detailed information about your CPU.
Optimizing Settings for Gaming
Once your OS and drivers are in place, optimize your system settings for the best gaming experience:
- Update Windows: Ensure you have the latest updates to improve security and system performance.
- Adjust Power Settings: Set your power plan to “High performance” to maximize gaming performance.
- Graphics Settings: Tweak your GPU’s control panel settings for optimal gaming visuals and performance.
This setup ensures that your gaming PC is not only ready to run but also optimized for performance. With the software properly installed, your system is almost complete.
How to Test Your New Custom Gaming Desktop
After assembling your custom gaming desktop and installing the necessary software, it’s crucial to conduct thorough testing and troubleshooting. This ensures that all components are working correctly and your system is ready for gaming.
Initial Boot Check:
Power Up: Ensure the system powers up without issues. Listen for any unusual noises that could indicate a problem with fans or drives.
BIOS/UEFI Check: Enter the BIOS/UEFI to verify that all hardware is recognized correctly. Check the CPU and memory speeds to ensure they match the specifications.
Stress Testing:
CPU and GPU Stress Tests: Use tools like Prime95 for CPU testing and FurMark for GPU testing. These programs stress your hardware to ensure stability under load.
Temperature Monitoring: Keep an eye on temperatures during stress tests. High temperatures might indicate inadequate cooling or improper installation of heat sinks.
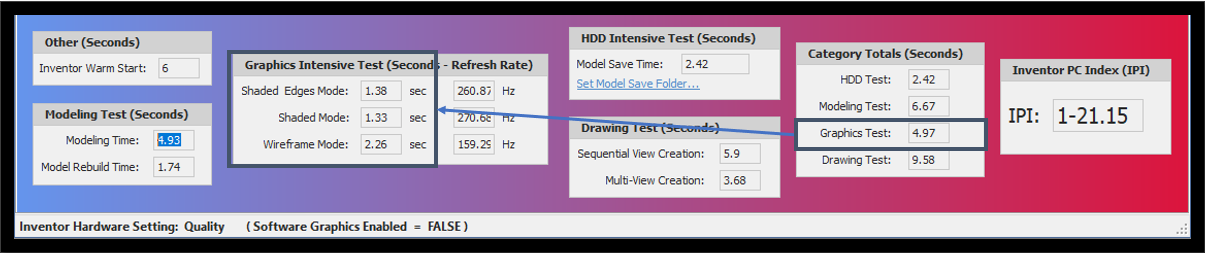
Performance Benchmarking:
Run Benchmarks: Tools like 3DMark or UserBenchmark can help you compare your system’s performance against similar systems. This can highlight potential issues or bottlenecks in your configuration.
Identifying and Solving Common Issues
No Post or Beeps:
If your system doesn’t boot, check power connections, ensure the RAM and GPU are properly seated, and that the CPU has no bent pins.
Motherboard Speaker Codes: If available, listen to beep codes or look at LED indicators for diagnostic codes that can help identify what might be wrong.
Overheating:
If components are overheating, verify that all fans are operational. Check that the CPU and GPU coolers are correctly mounted and that thermal paste was applied properly.
Ensure that the case has good airflow and that no cables are obstructing fan movements.
Driver Issues:
Update drivers if you encounter crashes or performance issues. Make sure you have the latest stable versions.
Reinstall drivers that are causing issues or roll back to a previous version if a new update causes problems.
Random Crashes or Blue Screens:
Check for hardware compatibility issues, especially with RAM and motherboards.
Run memory diagnostic tools to check for faulty RAM.
Ensure your power supply unit (PSU) provides adequate power for all components, especially if you’ve overclocked any parts.
When to Seek Professional Help
While many common issues can be resolved with a bit of research and patience, some problems might require professional expertise, especially if you suspect a faulty component. Don’t hesitate to contact customer support for your hardware, or bring your system to a professional if you are unable to resolve the issue yourself.
Testing and troubleshooting are crucial steps to ensure your custom gaming desktop runs smoothly and performs at its best. This proactive approach helps you avoid future problems and enjoy a superior gaming experience.
Keeping Your Custom Gaming Desktop Up-to-Date
Regular Software Updates:
OS Updates: Keep your operating system updated to patch security vulnerabilities and improve performance. Regular updates can also ensure compatibility with the latest games and software.
Driver Updates: Regularly update your GPU, motherboard, and other device drivers to enhance performance and fix bugs.
Antivirus and Security:
Maintain active antivirus software to protect against malware that could degrade performance or compromise your system’s security.
Consider using a firewall and performing regular system scans to keep your system safe.
Regular Maintenance Tips
Dust Management:
Dust accumulation can reduce airflow and cooling efficiency, leading to higher temperatures and reduced component lifespan. Clean your computer’s interior every few months using compressed air and a soft brush.
Ensure that filters and vents are clear of obstruction.
Thermal Paste Application:
Reapply thermal paste to your CPU and GPU every few years to ensure efficient heat transfer and keep temperatures low.
Cable Management:
Regularly check and manage cables to ensure good airflow and prevent dust buildup. Neatly arranged cables can also make it easier to upgrade components later.
Future-Proofing Your Gaming Desktop
Component Upgrades:
GPU: Upgrading your graphics card can dramatically increase gaming performance and support newer technologies like ray tracing.
CPU: Consider a CPU upgrade if your current processor becomes a bottleneck or to take advantage of advancements in processing power.
RAM: Adding more RAM can boost performance in multitasking and in newer games that require more memory.
Expansion and Compatibility:
When planning upgrades, ensure compatibility with existing components. Check power supply capacity and motherboard compatibility before adding or replacing parts.
Monitoring Performance:
Keep an eye on system performance over time. If you notice slowdowns or issues, it might be time to consider upgrading certain components.
Maintaining and upgrading your custom gaming desktop not only extends its life but also ensures it keeps pace with the latest gaming demands. This proactive approach saves money in the long run and enhances your gaming experience.
Conclusion
Building a custom gaming desktop is a deeply rewarding endeavor that blends technical skills with personal expression. By following the steps outlined—from planning and purchasing to assembly, software installation, and maintenance—you’ve equipped yourself with the knowledge to create a powerful gaming machine tailored to your specific needs. Remember, the journey doesn’t end with assembly; continuous updates, maintenance, and upgrades are essential to keep your system at peak performance. Embrace the process, enjoy the learning experience, and most importantly, have fun gaming on a system that you’ve built and understand from the ground up.
Ready to dive into the world of custom gaming desktops? Visit VOLTA PC today! Start by selecting your parts directly on our website. Whether you’re aiming for ultra-high performance or just starting out, we make it easy to customize the right setup for your needs. Plus, you won’t have to worry about the assembly—leave that to our experts. At VOLTA PC, we build your dream machine and deliver it ready for action. Don’t wait any longer, design your custom gaming desktop with us today and experience gaming like never before!