Welcome to the world of custom desktop! If you’re looking to elevate your computer’s interface beyond the standard icons and wallpapers, Rainmeter is your go-to solution. This powerful tool transforms your desktop into a dynamic and interactive workspace tailored to your needs.
Why settle for a generic desktop when you can customize it? With Rainmeter, you can display a wide array of live data directly on your desktop—ranging from system health stats to weather forecasts—all while keeping your aesthetic preferences in mind. The beauty of Rainmeter lies in its flexibility; whether you’re a casual user or a hardcore enthusiast, Rainmeter has something for everyone.
Throughout this guide, we will dive deep into how you can use Rainmeter to create a truly custom desktop. We’ll cover everything from basic setup to advanced tweaks that can help you get the most out of your computing experience. Get ready to unleash the full potential of your desktop!
Getting Started with Rainmeter For Your Custom Desktop
Downloading and Installing Rainmeter
To kick off your journey to a custom desktop, the first step is downloading Rainmeter. You can find the latest version of the software on the official Rainmeter website at Rainmeter.net. It’s completely free and open-source, making it accessible for everyone.
Once you’ve navigated to the website:
- Click on the “Download” section.
- Choose the version that suits your operating system. If you’re unsure, go with the stable version recommended by the site.
- Once the download is complete, run the installer. During installation, you can select “Standard Installation” which is suitable for most users. Advanced users can opt for “Portable Installation” if they prefer.
After installation, Rainmeter will automatically run and load a default skin that appears on your desktop. This serves as a quick introduction to what Rainmeter can do.
Initial Setup and Overview
When you first launch Rainmeter, a few widgets, often referred to as “skins,” will appear on your desktop. These might include a clock, disk usage, CPU and RAM meters, among others. Right-clicking on any skin will open the Rainmeter context menu. This menu is crucial as it allows you to manage skins, refresh data, and access settings.
In the Rainmeter Manager, which you can open from the context menu or the icon in your taskbar, you’ll see tabs labeled “Skins,” “Layouts,” “Settings,” and “About.” Spend some time familiarizing yourself with these sections:
- Skins: This is where you can load, unload, edit, and refresh skins.
- Layouts: Here, you can save and switch between custom desktop layouts.
- Settings: Adjust general settings such as language, on startup behavior, and more.
Getting comfortable with these options will help you manage and customize your desktop more efficiently.
Understanding Rainmeter’s Interface
")
Exploring Basic Components: Skins and Layouts
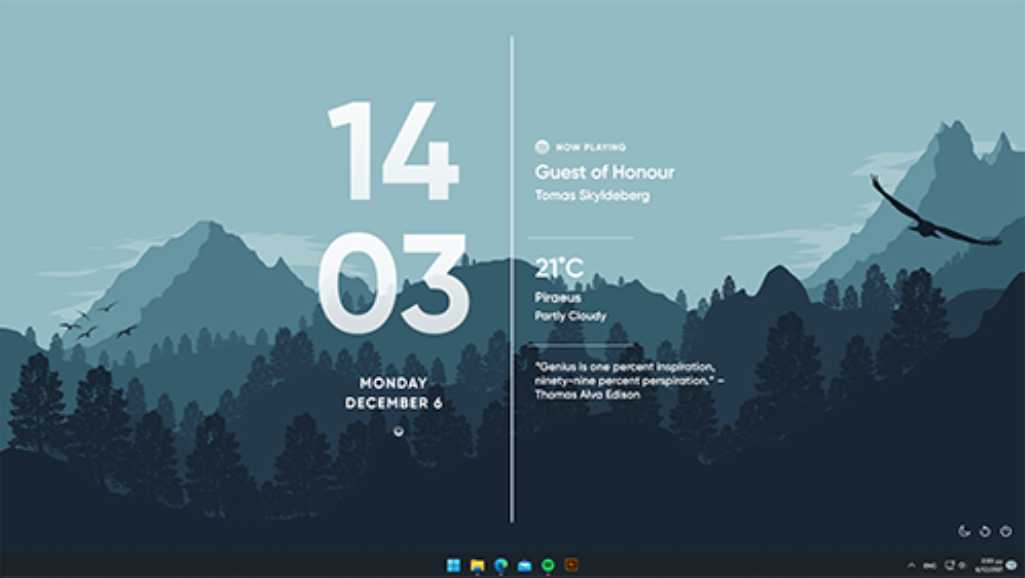
Rainmeter’s power comes from its skins—mini applications that live on your desktop. These skins can be anything from simple clocks to complex system monitors. Each skin operates independently but can interact with others to form a cohesive desktop environment.
Skins: Think of skins as building blocks for your custom desktop. You can move them around, customize their appearance, and configure their functionality to suit your needs. Each skin is stored in its own folder within the Rainmeter directory and consists of a .ini configuration file that controls its behavior.
Layouts: If you love having different setups for different tasks, layouts are for you. A layout in Rainmeter saves the current state of skins—what’s loaded, where it’s positioned, and how it’s configured. You can quickly switch between layouts, making it perfect for changing desktop setups based on your activity—work, gaming, creativity, etc.
Navigating the Interface
The primary way you’ll interact with Rainmeter and manage skins is through the Rainmeter Manager. Here’s a quick guide on navigating it:
- Active Skins Tab: This shows all the skins currently loaded on your desktop. You can unload skins here, or adjust settings like position, transparency, and ‘click through’ to make skins ignore mouse clicks.
- Settings Tab: This is where you can tweak Rainmeter’s behavior on your system. Adjustments here affect how Rainmeter interacts with your operating system, like starting automatically with Windows.
- Skins Tab: This is where you manage all available skins. You can browse through different skins you’ve downloaded or installed, see their configurations, and load them onto your desktop.
Familiarizing yourself with these areas will significantly enhance your ability to customize your desktop efficiently and creatively.
How to Use Skins to Enhance Your Custom Desktop
Finding and Installing Skins
Rainmeter skins are versatile and abundant, with a community of creators constantly developing new ones. Here’s how to find and install them:
Official Rainmeter Skins: Start with the basics. The Rainmeter installation comes with a few skins, but you can find more on the official Rainmeter forums and website.
DeviantArt and Other Communities: DeviantArt hosts a large collection of Rainmeter skins across various categories. You can search for “Rainmeter” on DeviantArt to find numerous custom skins, from minimalist clocks to detailed weather widgets.
Downloading and Installing: Once you find a skin you like, download the .rmskin file. Double-click this file after downloading, and Rainmeter will handle the installation. You can then load the new skin via the Rainmeter Manager.
Managing Skins
After installing new skins, managing them efficiently will help keep your desktop organized and functional:
Loading and Unloading Skins: Use the Rainmeter Manager to load new skins onto your desktop. If a skin isn’t fitting well, you can unload it just as easily without deleting it.
Customizing Skins: Most skins allow for some level of customization. Right-click on a skin and select “Edit Skin” to open its .ini file in a text editor. Here, you can change parameters like colors, fonts, and even functionality. Remember to refresh the skin after making changes to see them in effect.
Tips for Skin Customization
Coordinate Colors: Match your skin colors with your wallpaper or overall desktop theme to create a cohesive look.
Functional Layouts: Position skins strategically. For instance, place system monitors near the top for easy viewing, or tuck a music player near the bottom corner.
Performance Considerations: Keep in mind that having many skins active, especially those that update frequently like weather or RSS feeds, can impact system performance. Balance aesthetics with functionality.
Creating Functional Custom Desktops with Rainmeter
Rainmeter allows you not just to beautify your desktop but to make it a hub of functionality tailored to your needs. Here’s how to set up useful widgets:
Setting Up Essential Widgets
Weather Widget: Stay updated with the weather without opening a browser. Customize your weather widget to display current conditions, forecasts, or even severe weather alerts.
System Monitors: Keep an eye on your CPU, GPU, RAM usage, and more with system monitor skins. This is especially useful for gamers or anyone who uses heavy applications.
Media Controls: Integrate a music player on your desktop that not only shows what’s playing but also lets you control playback without switching windows.
Integrating Media and Live Data
RSS Feeds: Keep up with news or your favorite blogs directly from your desktop. Set up an RSS reader skin to fetch live updates.
Real-Time Data Display: From stock tickers to live sports scores, customize skins to fetch and display real-time data that matters to you.
Advanced Customization Techniques
Modifying Existing Skins
Once you’re comfortable with basic skin management, modifying existing skins can greatly enhance your desktop’s functionality and aesthetic. Here’s how to start tweaking:
Edit Skin Configuration Files: Open the .ini file of a skin to tweak its settings. This file contains all the adjustable parameters like dimensions, fonts, colors, and functionality. Changing these parameters can significantly alter how a skin looks and operates.
Combine Elements from Different Skins: You can take components from various skins and merge them. For example, if you like the clock from one skin and the weather display from another, you can combine these elements into one skin. This requires some familiarity with the Rainmeter coding language, but it’s a powerful way to customize.
Creating Your Own Skins
For those who want a truly unique desktop, creating your own skins is the way to go. This can be challenging but rewarding:
Learn the Basics of Rainmeter Coding: Start with the Rainmeter documentation to understand the basics of its scripting language. It’s straightforward and designed to be accessible.
Use Templates: Begin with a simple template and gradually add more features. Templates can be found in the Rainmeter community forums or by dissecting existing skins.
Test Frequently: As you build your skin, test it frequently to check both functionality and performance. This iterative process helps fine-tune both design and operation.
Using Rainmeter for System Optimization
Rainmeter isn’t just about aesthetics; it can enhance your computing efficiency:
Custom Shortcuts: Create skins that serve as shortcuts to frequently used apps, files, or folders. This reduces desktop clutter and speeds up your workflow.
Resource Monitoring: Develop or customize skins that monitor system health, like disk space and memory usage, to keep your system running smoothly.
Resources and Community Support
As you venture into deeper customization, you may need inspiration or run into technical challenges. Here’s where to look for help:
Rainmeter Subreddit: A vibrant community where users share their setups and skins. It’s also a great place to ask for help and advice.
DeviantArt: Not only for downloading skins but also for seeing how others use Rainmeter in creative ways.
Official Rainmeter Forums: A resource-rich forum for troubleshooting, guides, and user projects.
Conclusion: Unleash the Full Potential of Your Desktop with Rainmeter
Congratulations on reaching the end of this detailed guide on how to customize your desktop with Rainmeter! By now, you should have a solid understanding of how to use Rainmeter to transform your desktop from a mere backdrop to a vibrant and functional hub of your digital life.
Recap of What You’ve Learned
Getting Started: You’ve learned how to download, install, and navigate Rainmeter, setting the stage for deeper customization.
Using Skins: We explored how to enhance your desktop with skins, managing and customizing them to fit your personal style and needs.
Functional Desktops: You’ve seen how to add practicality to your setup with widgets like system monitors, media controls, and RSS feeds.
Advanced Techniques: We delved into modifying and creating skins, pushing the boundaries of what’s possible with desktop customization.
Community Resources: Finally, we highlighted the importance of community support and resources available to help you continue your journey in desktop customization.
Encouragement to Explore
The true beauty of Rainmeter lies in its flexibility and the creativity it affords you. Every desktop setup you create can be as unique as you are, reflecting your personality, preferences, and needs. Whether you’re looking to streamline your workflow or just want your desktop to look cool, Rainmeter gives you the tools to make it happen.
Keep experimenting with different skins, tweak your setups, and perhaps even share your creations with the Rainmeter community. The more you play around with the settings and features, the more adept you’ll become at harnessing the full potential of this powerful tool.
Thank you for following along with this guide. Your journey towards a fully customized desktop is just beginning, and the possibilities are as limitless as your imagination. Dive in, have fun, and make your desktop genuinely your own!
If you’re inspired to enhance your digital workspace with a new custom desktop, consider exploring the offerings at Volta PC. With a wide range of high-performance machines, Volta PC specializes in creating custom desktop that cater to your unique needs and preferences. Whether you’re a gamer, a creative professional, or just someone who loves a streamlined and powerful computing experience, Volta PC has the perfect solution for you. Visit Volta PC today to find out how you can elevate your desktop experience to new heights!
FAQs
Does Rainmeter use a lot of RAM?
Rainmeter is highly efficient in its use of RAM, especially considering the dynamic functionalities it brings to your custom desktop. The amount of RAM used by Rainmeter largely depends on the number and complexity of skins you are running. Basic setups typically require minimal resources, but more elaborate skins that fetch real-time data from the internet or monitor system stats may use more RAM. However, even with extensive customization, Rainmeter is designed to be light on system resources.
How do I put Rainmeter on my desktop?
To add Rainmeter to your desktop, start by downloading and installing the software from its official website. Once installed, Rainmeter automatically loads some default skins onto your desktop. You can explore and load additional skins through the Rainmeter Manager, which you can access by right-clicking on any active skin or the Rainmeter icon in the system tray. From there, you can choose which skins to display, helping you customize your desktop to your liking.
Is Rainmeter good for PC?
Rainmeter is excellent for PCs, particularly if you’re looking to enhance your desktop beyond the standard layout. It allows for significant customization and personalization, turning your desktop into a functional and visually appealing workspace. Rainmeter is not only lightweight but also stable, making it a popular choice among users looking to create a custom desktop without compromising system performance.
Is Rainmeter virus free?
Yes, Rainmeter is virus-free. It is an open-source application that is safe to download and use. The official versions available from the Rainmeter website are thoroughly vetted and secure. However, when downloading skins or plugins from third-party sources, always ensure they are from reputable websites to avoid the risk of inadvertently downloading malicious content. It’s a good practice to read user reviews and feedback to ensure safety and reliability.