Welcome to the ultimate guide on GPU cache and how to clean it! Whether you’re a gamer, a developer, or simply someone who wants to understand the nuts and bolts of computer graphics, this guide is for you. We’ll take you on a journey through the fascinating world of GPU cache, from its basic definition to its critical importance, and even its role in different GPU architectures. Moreover, we’ll provide actionable tips on how to optimize and clean your GPU cache for peak performance. So, buckle up and get ready to unlock the full potential of your GPU!
What is GPU Cache?
So, you’ve heard about GPU cache, but what exactly is it? Well, you’re in luck. Today, we’ll dive deep into this topic. We’ll explore its definition, how it works, and why it’s crucial for modern computing systems.
The Basics
First off, what is GPU cache? Simply put, it’s a high-speed memory integrated into Graphics Processing Units (GPUs). This memory stores frequently used data and instructions. The aim? To act as a buffer between the GPU and the slower main memory. This setup enables faster access to data, thereby reducing latency. In modern computing, GPU cache plays a pivotal role in accelerating tasks like graphics rendering, machine learning, and scientific simulations.
Compared to CPU Cache
Now, you might wonder how it differs from CPU cache. Well, GPU cache is generally larger and more complex. This complexity arises from the high parallelism and data-intensive nature of GPU workloads. While CPU cache stores both data and instructions, GPU cache focuses mainly on data storage and retrieval. This specialization makes GPUs particularly effective for data-parallel computations.
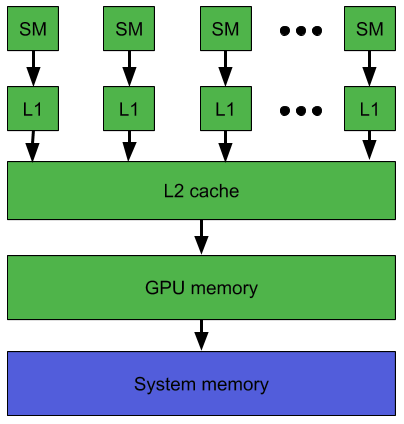
Types of GPU Cache
Let’s move on to the types of GPU cache. There are three main kinds:
L1 Cache: The smallest and fastest, located closest to the processing cores. It stores frequently used data and instructions, allowing for rapid access and reduced latency.
L2 Cache: Slightly larger and slower, this cache is further away from the processing cores. It serves as a backup to the L1 cache and stores a more extensive set of frequently accessed data and instructions.
Unified Cache: This is a newer type of cache that combines the functions of both L1 and L2 caches. It offers a good balance between speed and capacity.
How It Works
So, how does GPU cache work? When you run a program or a game, the GPU cache stores the most frequently used data. The next time you launch that program or game, the GPU retrieves this data from the cache. This process speeds up the launch and operation of the software. In essence, it makes your computing experience smoother and faster.
Why It Matters
In summary, GPU cache is not just a technical jargon but a critical component that enhances your computing experience. It speeds up data-intensive tasks and makes your GPU more efficient. So, the next time you hear about GPU cache, you’ll know it’s something worth paying attention to.
Why is GPU Cache Important?
So, you’ve learned what GPU cache is. Now, let’s delve into why it’s so crucial in today’s computing landscape. From gaming to machine learning, GPU cache is the unsung hero that makes everything run smoother.
Speeding Up Processes
Firstly, GPU cache speeds up data-intensive tasks. When you launch a game or an application, the GPU cache already stores the most frequently used data. This means the GPU can quickly access this data, making the launch and operation of the software faster.
Reducing Latency
Moreover, GPU cache plays a vital role in reducing latency. Latency is the time it takes for a system to respond to an action. In gaming, for example, lower latency means quicker response times, which can be the difference between winning and losing.
Enhancing Efficiency
Efficiency is another key benefit. The cache allows the GPU to work more effectively by reducing the number of times it has to access the slower main memory. This not only speeds up tasks but also reduces the workload on the main memory.
Importance in Specialized Tasks
In specialized fields like machine learning and scientific simulations, GPU cache is indispensable. It helps in the rapid execution of algorithms and complex calculations. This speed is crucial in fields that require real-time data processing.
Versatility Across Workloads
Interestingly, the type of GPU cache used can vary depending on the specific requirements of the workload. This adaptability makes it a versatile component in modern computing systems.
Future-Proofing Your System
Furthermore, as technology advances, the role of GPU cache is likely to become even more significant. It’s not just about current performance; it’s also about being prepared for more demanding applications and games that will come in the future.
Cache Maintenance
It’s worth noting that GPU cache is maintained and updated for upcoming notices about updates and maintenance. This means your most used games and apps run faster not just now, but they will continue to do so in the future.
The Cost of Ignoring Cache
Lastly, ignoring or clearing your GPU cache can lead to a significant decrease in the overall performance of your GPU. Most GPU companies have developed mechanisms for recovering deleted cache, but it’s generally not recommended to clear it.
Key Metrics to Understand GPU Cache Performance
You’ve learned what GPU cache is and why it’s important. Now, let’s dive into the key metrics that can help you understand GPU cache performance. These metrics offer valuable insights into how well your GPU is functioning.
EU Idle %
Firstly, the EU Idle % metric represents the percentage of time when the GPU execution units (EUs) are idle. If this percentage is high, it indicates that there are stalls elsewhere in the rendering pipeline.
EU Active %
Moreover, EU Active % shows the percentage of time when the EUs are actively executing instructions. A high percentage here means that the EUs are effectively utilized
EU Stall %
Additionally, EU Stall % measures the time when the EUs are stalled. If this metric is unexpectedly high, especially when compared to the EU Active % metric, you can analyze where the stalls happen
VS Duration
Interestingly, VS Duration approximates the total GPU time spent executing vertex shader code. If this duration is significant, vertex processing optimizations might be needed
VS EU Active %
Furthermore, VS EU Active % represents the percentage of overall GPU time that the EUs were actively executing Vertex Shader instructions. This metric is important if vertex processing seems to be a bottleneck
Speed of Light (SOL) Metrics
Another key metric is the Speed of Light (SOL), which lets you know how well the whole GPU is utilized. It also identifies what hardware units and sub-units are limiting the performance
Cache Hit Rates
Also, Cache Hit Rates for L1 and L2 caches are crucial. These rates indicate how often the GPU is successfully retrieving data from the cache instead of the slower main memory
GPU Trace and SM Active %
In more advanced scenarios, metrics like GPU Trace and SM Active % can provide deeper insights. These metrics help you understand the GPU’s efficiency and where potential bottlenecks might exist
Uthese key metrics can significantly help you in optimizing your GPU’s performance. Whether you’re a gamer, a developer, or just someone interested in hardware, these metrics offer a comprehensive view of how well your GPU is functioning.
How to Optimize GPU Cache
By now, you’ve gained a solid understanding of what GPU cache is, its importance, and its role in different architectures. Next, let’s focus on how to optimize GPU cache for better performance. This is crucial for gamers, developers, and anyone who wants to get the most out of their system.
NVIDIA Reflex Technologies
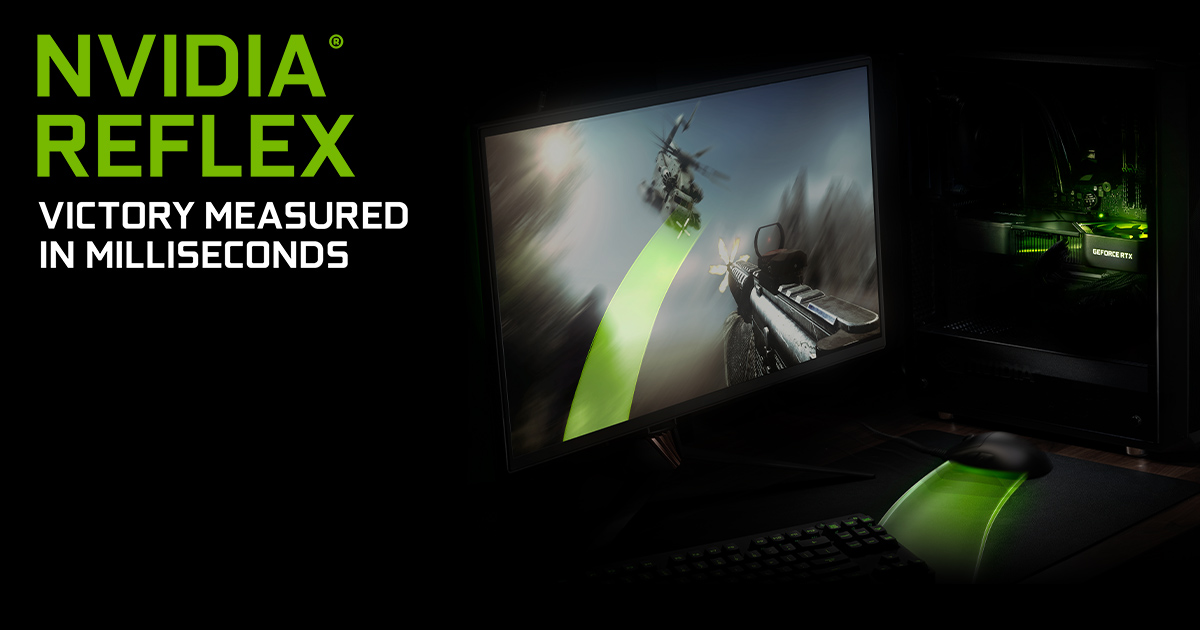
Firstly, if you’re using an NVIDIA GPU, consider enabling NVIDIA Reflex technologies. This feature optimizes your setup for the lowest possible system latency. It ensures that your CPU submits work to the GPU just in time for rendering, thereby optimizing cache performance.
Ultra Low Latency Mode
Moreover, if NVIDIA Reflex is not available, your next best option is the Ultra Low Latency mode in the NVIDIA graphics driver. This setting reduces the render queue and optimizes cache performance.
Exclusive Fullscreen Mode
Additionally, always opt for Exclusive Fullscreen mode if possible. This bypasses the Windows compositor, which can add latency and affect cache performance.
Memory Integrity and VMP
Interestingly, Windows 11 has features like Memory Integrity and Virtual Machine Platform (VMP) that can impact performance. You have the option to turn off these features for better cache performance while gaming.
Polling Rate Adjustment
Furthermore, consider increasing the polling rate of your mouse and keyboard. A higher polling rate means that your devices can deliver more frequent clicks and movements to the PC, thereby reducing system latency and optimizing cache performance.
Software Tools
Various software tools can help you monitor and optimize GPU cache. These tools provide real-time statistics and allow you to make adjustments as needed.
Driver Updates
Regularly updating your GPU drivers can also lead to better cache performance. Manufacturers often release updates that include optimizations for cache and other components.
Optimizing GPU cache is not a one-size-fits-all process. It involves a combination of hardware settings, software tools, and best practices. By taking the time to understand and apply these optimization techniques, you can significantly improve your system’s performance.
How to Clean Your GPU Cache
You’ve learned about the intricacies of GPU cache, from its importance to optimization techniques. Now, let’s focus on how to clean your GPU cache. This is essential for maintaining optimal performance and freeing up disk space.
Why Clean GPU Cache?
Firstly, you might wonder why cleaning the GPU cache is necessary. Over time, the cache can accumulate old and unnecessary files. These files can take up valuable disk space and even cause performance issues.
Precautions Before Cleaning
Moreover, it’s crucial to take some precautions before you start the cleaning process. Ensure that you’ve saved all your work and closed any running applications. This is because cleaning the GPU cache can lead to the loss of unsaved data.
Using NVIDIA Control Panel
For NVIDIA users, you can clean the cache through the NVIDIA Control Panel. Navigate to the ‘Shader Cache’ option and click on ‘Clear.’ This will remove all the old shader cache files, optimizing your GPU performance.
- Close All Running Applications
Firstly, make sure to close all running applications, especially those that use the GPU. This ensures that the cache cleaning process won’t interfere with any ongoing tasks.
- Open NVIDIA Control Panel
Next, right-click on your desktop and select ‘NVIDIA Control Panel’ from the context menu. This will open the NVIDIA Control Panel window.
- Navigate to the Shader Cache Option
Once the Control Panel opens, go to the ‘3D Settings’ section in the left-hand menu. Then, click on ‘Manage 3D Settings.’ Here, you’ll find the ‘Shader Cache’ option.
- Clear the Cache
After locating the ‘Shader Cache’ option, click on it to reveal a dropdown menu. Select ‘Off’ to disable the Shader Cache temporarily. Click ‘Apply’ to save the changes.
- Re-enable Shader Cache
Now, go back to the ‘Shader Cache’ dropdown menu and select ‘On.’ This will clear the old cache and create a new one. Click ‘Apply’ again to save the changes.
- Restart Your Computer
Lastly, it’s a good practice to restart your computer after making these changes. This ensures that the new settings take effect properly.
Using AMD Radeon Settings
Additionally, if you’re using an AMD GPU, you can clean the cache through the Radeon Settings. Go to the ‘Gaming’ tab, select ‘Global Settings,’ and then click on ‘Reset Shader Cache.’ This will clear all the cached shaders.
- Close All Running Applications
Firstly, make sure to close all running applications, especially those that use the GPU. This ensures that the cache cleaning process won’t interfere with any ongoing tasks.
- Open AMD Radeon Settings
Next, right-click on your desktop and select ‘AMD Radeon Settings’ from the context menu. This action will open the AMD Radeon Settings window.
- Navigate to the Global Settings
Once inside the Radeon Settings, click on the ‘Gaming’ tab located at the top. Then, select ‘Global Settings’ to access the universal settings for your GPU.
- Locate the Shader Cache Option
After entering the Global Settings, scroll down until you find the ‘Shader Cache’ option. This is where you can manage your GPU cache.
- Reset the Shader Cache
Click on the ‘Reset Shader Cache’ button. A prompt will appear, asking you to confirm the action. Click ‘Yes’ to proceed with clearing the cache.
- Apply Changes and Close
After resetting the shader cache, click ‘Apply’ at the bottom right corner to save the changes. You can now close the AMD Radeon Settings window.
- Restart Your Computer
Lastly, it’s advisable to restart your computer to ensure that the new settings take effect.
Using Windows PowerShell
Interestingly, you can also use Windows PowerShell to toggle your GPU off and on, effectively clearing the cache. This involves running a script that disables and then enables your GPU.
- Close All Running Applications
Firstly, make sure to close all running applications, especially those that use the GPU. This ensures that the cache cleaning process won’t interfere with any ongoing tasks.
- Open Open Windows PowerShell ISE
Next, open Windows PowerShell ISE by searching for it in the Start menu or by pressing Win + X and selecting Windows PowerShell (Admin).
- Copy and Paste the Script
In the PowerShell ISE window, copy and paste the following script:
Disable the GPU
Get-PnpDevice -FriendlyName “GPU NAME” | Disable-PnpDevice
Adjust wait time (in seconds)
Sleep -Seconds 5
Enable the GPU
Get-PnpDevice -FriendlyName “GPU NAME” | Enable-PnpDevice
Note: Replace “GPU NAME” with the exact name of your GPU as seen inside the Device Manager - Save the Script
After pasting the script, save it to your desktop or any other location you prefer.
- Run the Script
Right-click on the saved script and select ‘Run with PowerShell.’ This will toggle your GPU off and then on, effectively clearing the cache.
- Restart Your Computer
Lastly, restart your computer to ensure that the changes take effect.
Third-Party Tools
Furthermore, there are third-party tools available that can help you clean your GPU cache. These tools offer a more comprehensive cleaning process, removing not just shader cache but also other temporary files.
Regular Maintenance
It’s good practice to clean your GPU cache regularly. This ensures that your GPU performs at its best, especially when you’re running resource-intensive tasks like gaming or video editing.
Cleaning your GPU cache is a straightforward but essential maintenance task. It helps in freeing up disk space and ensures that your GPU performs optimally. Whether you’re using NVIDIA, AMD, or any other GPU, regular cache cleaning can make a significant difference in your system’s performance.
Frequently Asked Questions (FAQs) on Clean GPU Cache
Can I delete GPU cache folder on desktop?
Yes, you can delete the GPU cache folder on your desktop, but proceed with caution. Deleting this folder will remove cached shaders and other temporary files, which may result in longer load times for some applications. Always make sure to back up important data before taking such actions.
Does a GPU have cache?
Absolutely, GPUs do have cache. The cache is a high-speed memory integrated into the Graphics Processing Unit (GPU). It stores frequently used data and instructions, acting as a buffer between the GPU and the slower main memory. This setup enhances the overall performance of the GPU.
How do I clear my GPU cache?
Clearing your GPU cache depends on the type of GPU you have. For NVIDIA users, you can go to the NVIDIA Control Panel, navigate to the ‘Shader Cache’ option, and click ‘Clear.’ AMD users can go to Radeon Settings, select ‘Global Settings,’ and then click ‘Reset Shader Cache.’ Some third-party tools can also help you clear GPU cache.
What is cache in graphics?
In graphics, cache refers to a high-speed memory integrated into the GPU. It stores frequently used data and instructions, reducing the time it takes for the GPU to access this information from the main memory. This is particularly important for tasks like graphics rendering and video processing.
Is it safe to remove GPU?
Removing a GPU is generally safe if done correctly, but it’s not a task to be taken lightly. Always turn off and unplug your computer before removing any hardware components. Make sure to follow the manufacturer’s guidelines and take necessary precautions to avoid damaging the GPU or other components.
What happens if I delete my cache folder?
Deleting your cache folder will remove temporary files that your system or applications have stored. While this can free up disk space and sometimes improve performance, it may also result in longer load times for some applications. Always back up important data before deleting any folders.
Conclusion
We hope this comprehensive guide has shed light on the fascinating world of GPU cache. From its basic definitions to its crucial role in different architectures, we’ve covered it all. Whether you’re a gamer, a developer, or just someone interested in computer graphics, understanding GPU cache can significantly enhance your computing experience.
Ready to take your gaming or computing to the next level? Don’t miss out on the latest gaming PCs, laptops, and hardware upgrades. Check out Volta PC for top-of-the-line options tailored to your needs.